

How To Install Sheet Metal
How to Install Metal Roofing
Learn how to get covering layers correct with these metal covering tips.
![]() Time
Time
Multiple Days
![]() Complication
Complication
Advanced
![]() Cost
Cost
More than $5000
Introduction
Wi th its sleek, modern look, metal panel covering was our first option for the Getaway. It has no visible seams and is maintenance free — fifty-fifty a light rain will wash leaves and sticks off the roof. Even better, it won't grow moss and algae in the shade of the Wisconsin forest.
A metal roof volition reduce cooling costs by reflecting oestrus and terminal l to 70 years. Armed with a basic understanding of the anatomy of a metal roof, along with a few tips, you can install ane yourself in just a few days.
Pro tip: It's all virtually the layers. When it rains, a roof sheds h2o from one layer to the next until information technology runs off the roof. Build roof layers the right style and your home will stay dry inside for its entire life.
Tools Required
Materials Required
- Metallic Roofing Panels
- Ice and H2o Shield
- Roofing Nails
- Eave Trim
- Gable Trim
- Ridge Cap
- Sidewall Flashing
- Self Tapping Roofing Screws
- Metal Roofing Sealant
- Within Foam Closure Strips
- Outside Cream Closure Strips
- Butyl Tape
- Roofing Vent Boots
Project step-by-step (eleven)
Stride 1
Apply the underlayment
-
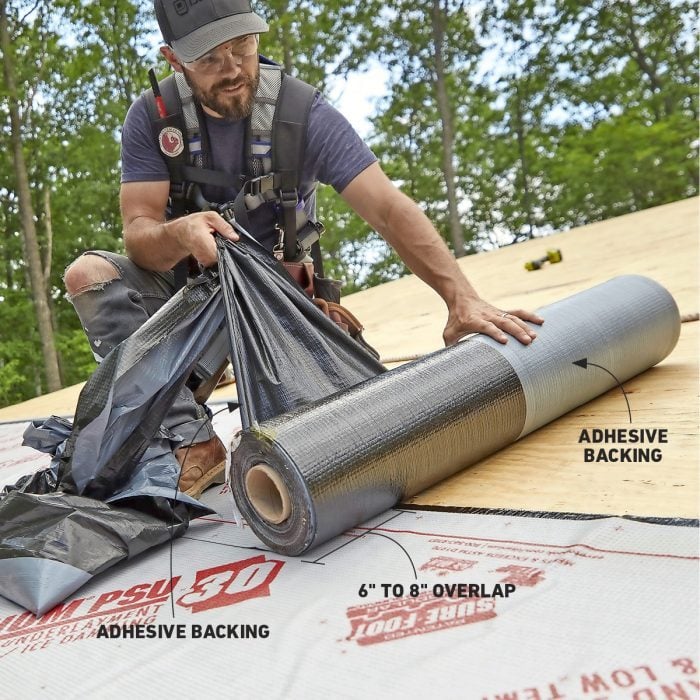
The first layer on top of the plywood or OSB roof deck is underlayment. For this, we chose a cocky-healing water ice-and-water membrane to protect the shallow-pitched roof deck.
-
The tricky part in laying the underlayment is keeping it flat and wrinkle-free. Unroll the underlayment across the roof while removing the bottom half of the adhesive backing. Overlap the previous layer by 6 to eight inches. In one case the underlayment is rolled out, cut it flush and pull the rest of the adhesive backing out from underneath.
Stride two
Guild panels to fit
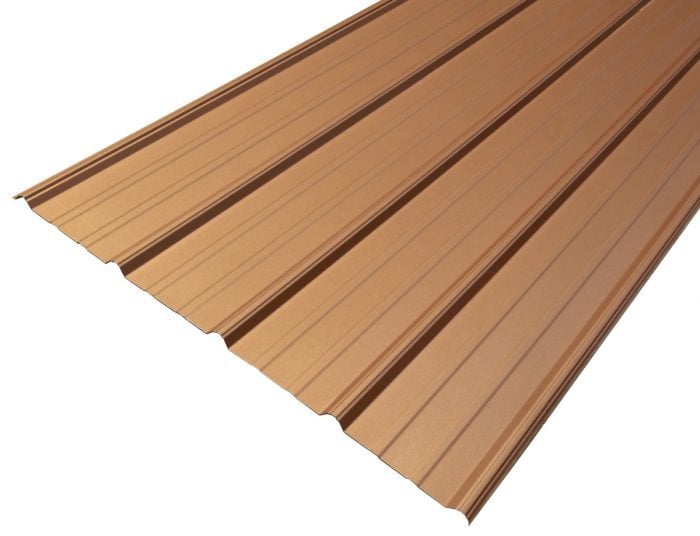
- If possible, avert seams in your roof. They don't wait great, and it could lead to water getting underneath the panels.
- I had our metal covering panels cut to fit the length of our roof. They were about 32 feet long and had to be delivered on a flatbed trailer. Of course, yous'll need a large lift to hoist the panels on summit of the roof. If y'all don't take one, y'all'll take to order more manageable lengths.
![]()
Step 3
Bend trim ends closed
- Before you install the trim, cut and bend the leading end to wrap it around the corner. Make a series of one-inch cuts with aviation snips at each curve to create tabs. Fold the tabs in with a hand seamer to run across a wall or a corner, or to close a gap created by the trim. Each trim is a different shape, requiring unique cuts and bends.

Step 4
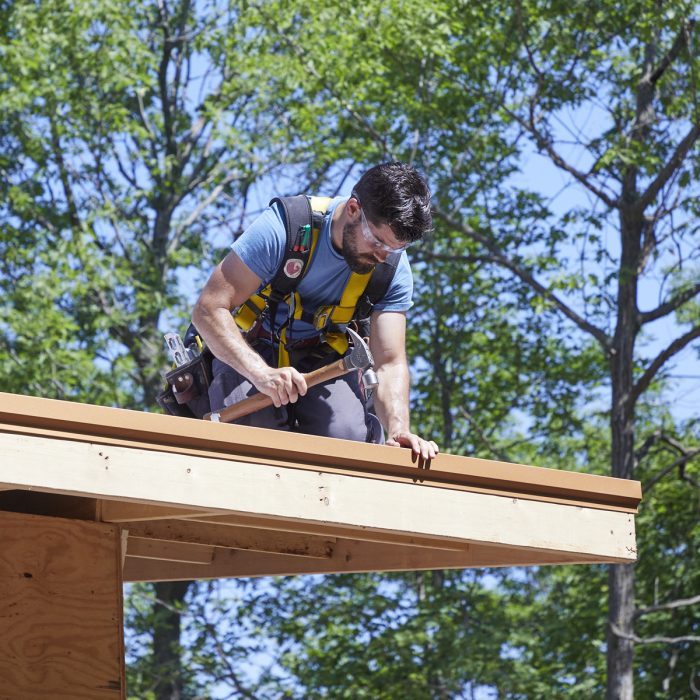
Fasten eave trim
- Install the eave trim tight to the fascia and fasten information technology to the roof deck over the underlayment with one-inch roofing nails. In warmer climates, the eave is attached before the underlayment. In northern Wisconsin, where water ice dams are mutual, nosotros install these atop the underlayment to protect the entire roof from dams.
Stride 5
Splice and overlap trims
- Where two trim ends run across, y'all'll splice them together. First, cut the bottom hem of the underlapping trim at an angle. Afterward installing the underlapping trim, apply sealant on top. Pry open the lesser hem of the overlapping trim and slide information technology over the angle-cutting hem of the underlapping trim.

Step 6
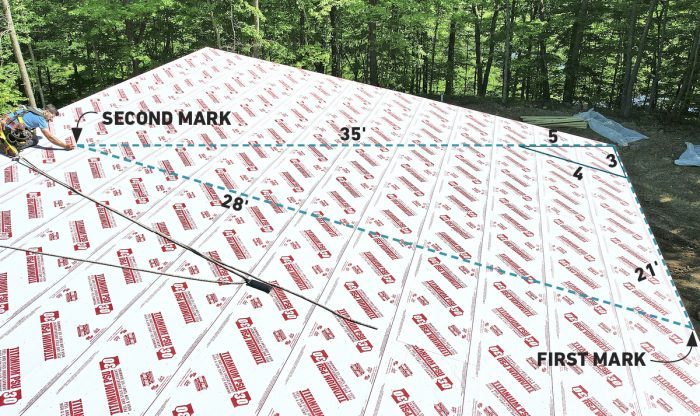
Snap a square reference line
- A square reference line is important for installing roofing panels evenly. Use the iii-iv-5 method to establish a reference line 90 degrees to the eave.
- First, make a mark along the eave three feet (or whatsoever multiple of 3) from the corner. At that marker, mensurate four feet (or the same multiple of four) toward the ridge. Then, from the original corner, mensurate 5 feet (or the same multiple of five) and marker where it intersects the second marker.
- Snap a line from the commencement three-foot mark through the intersection of the second and third marks. Since the Getaway roof is larger, I measured to 21 feet, 28 feet and 35 feet (seven times three, four and v) to make my square reference line.
Stride vii
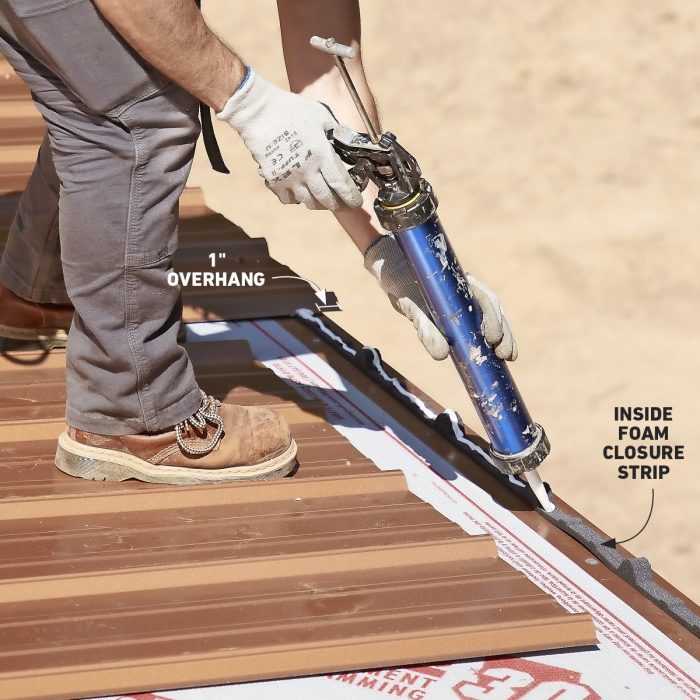
Ready the panels
- Place each metal console on an inside foam closure strip. These strips are shaped to fit the corrugated underside of the panel and keep bugs and water from getting underneath.
- Position the closure strips along the eave about i inch from the border and stick them to the panels with butyl tape. Run a bead of sealant on top of the closure strip, and then set your panel and then information technology overhangs beyond the eave by one inch. Conform the panel so whatever measurement from it to the reference line is the same at the acme and bottom.
Step 8
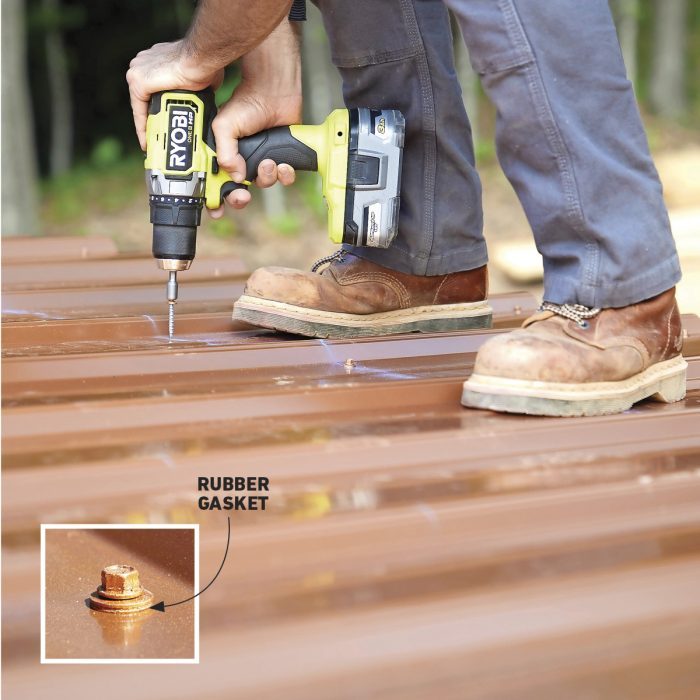
Drive screws just right
- Fastening the panels just right is the key to a watertight roof. Here is what yous should know:
- At the eave, place screws on both sides of every rib and lined up to go through the foam closure strip.
- Each row should exist spaced no more than 24 inches with one screw at each rib on the overlapping side.
- Offset at the bottom, fastening across the panel in rows, working toward the ridge.
- Drive screws to seat flat on the roof; a crooked screw won't seal.
- Don't over-tighten or under-tighten. Tighten but enough to compress the rubber gasket to the border of the spiral caput, non past it.
- Clean upwards whatsoever metal shavings or burrs correct abroad. They volition rust.
Step 9
Overlap the panels
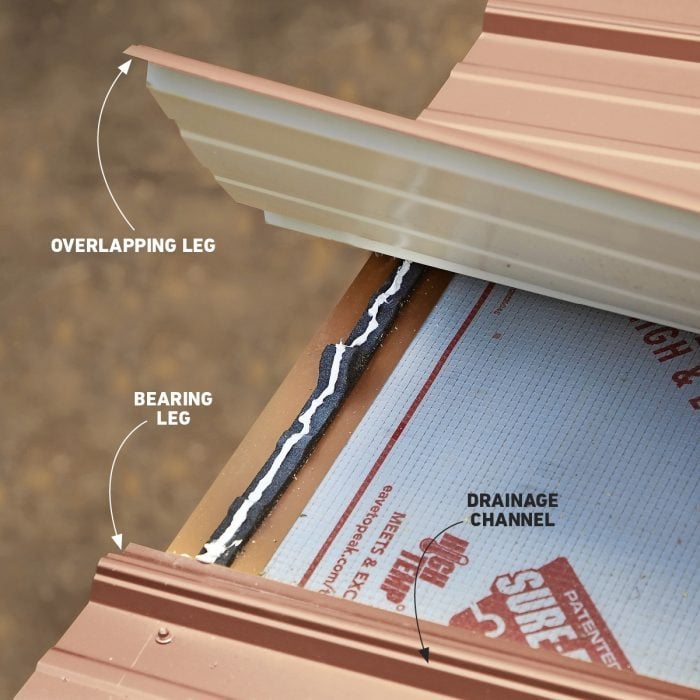
- The two edges of the metal panels are different. The edge that overlaps has a shorter rib leg that doesn't contact the roof surface when laid flat. The rib on the underlapped side has a drainage or anti-siphon channel to keep water moving toward the eave. Overlap the terminal rib on each panel; they should nest together perfectly.
Step 10
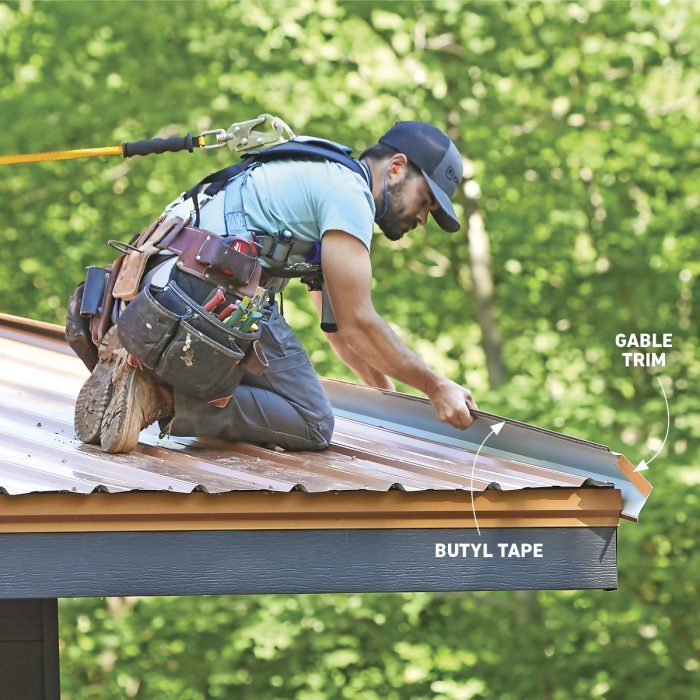
Cover the rake edge
- After all the panels are fastened, it's time to adhere the gable trim. This cleans up the edge of the panel and keeps rain and snowfall from getting under the roof panels and siding.
- After you bend the end of the trim to meet the corner at the eave, apply butyl tape on the underside of the trim where it lands on the flat function of the roof panels. Printing it in identify and drive screws every 12 inches correct over the butyl tape.
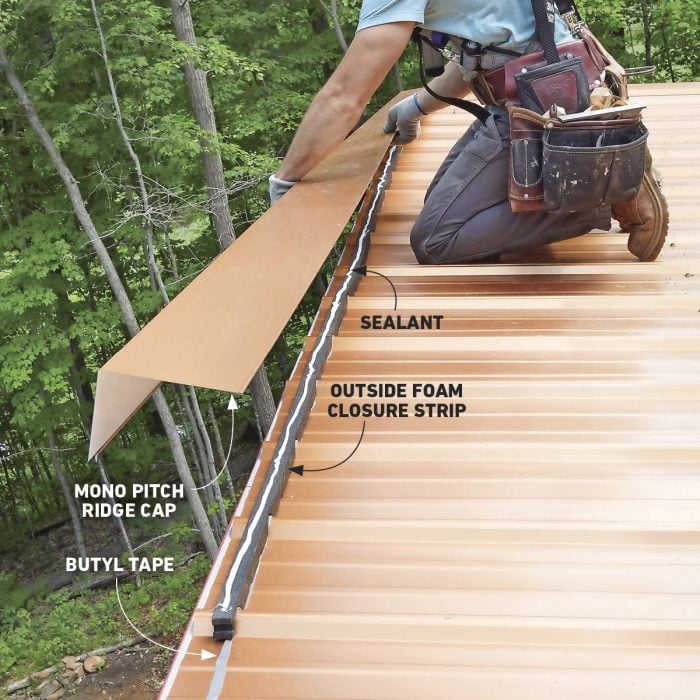
Stride 11
Secure the ridge cap
- To cap the roof, adhere a line of outside closure strips with butyl tape iv inches from the top of the peak; this is where you'll fasten the ridge cap to the roof with screws. Employ a bead of sealant on the foam closure, and so fit the ridge cap on the meridian and spike with two-inch screws to the roof deck through every rib.
- With the cap of the roof complete, all the water that lands on the roof will get out the roof without ever touching the underlayment.
Originally Published: August 23, 2022

Source: https://www.familyhandyman.com/project/how-to-install-metal-roofing/
Posted by: wellsarmand.blogspot.com
0 Response to "How To Install Sheet Metal"
Post a Comment